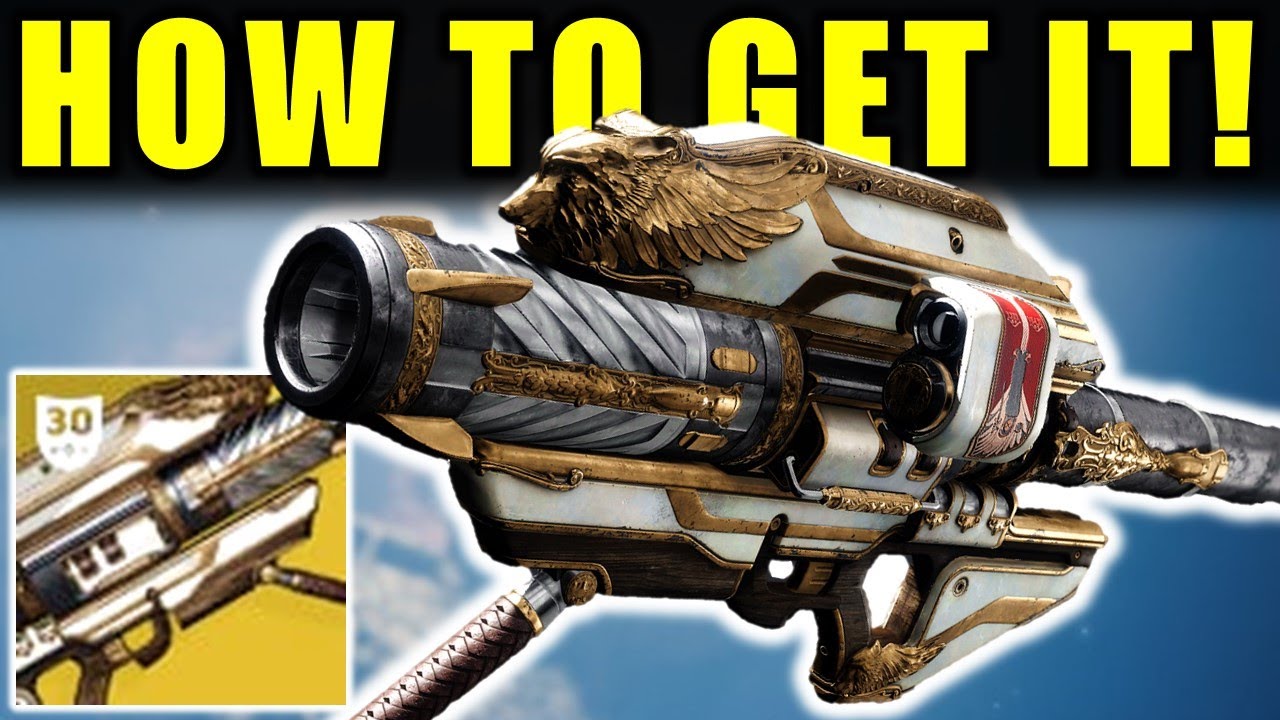
Destiny 2 Gjallarhorn Driver Guide: How To Power Up The Unique Rocket Launcher
Gjallarhorn is one of the most fabled weapons in the Fate franchise, and also its return to Destiny 2 has come with some fanfare-- you'll have to finish the new dungeon, Grasp of Avarice, as component of the game's brand-new Bungee 30th Anniversary party DLC. It deserves doing, though, due to the fact that Gjallarhorn is just as effective as Fate 1 Guardians will keep in mind. As well as soon as you have the Unique rocket launcher (use our Gjallarhorn overview if you wish to know exactly how to grab it), you'll wish to unlock its Unique stimulant to enhance its power also a lot more.
To find the driver, you'll need to do some specific points in the Grasp of Avarice dungeon. The bright side is, you can complete these steps on either dungeon trouble, that makes the stimulant pretty very easy to nab if you recognize what you're trying to find. Below's every little thing you require doing to make the Gjallarhorn Exotic catalyst.
3 Chests In The Grasp Of Avarice
Like numerous various other Unique catalysts for unique tools like Gjallarhorn, you'll have to resolve some challenges within the Grasp of Avarice dungeon to get this stimulant. This is a much simpler procedure than with guns such as Vex Osteoclast or Whisper of the Worm, nevertheless. In Grasp of Avarice, you need to seek out 3 unique depositories, which you'll need to unlock by dealing with three particular opponents.
Those adversaries are effective Fallen Vandals, understood as Reader Vandals. Each of these elite-level adversaries (which suggests they have a yellow wellness bar) wields a Scorch Cannon and also generates near the chest you're trying to open up. The great information is, you do not need to eliminate these Reader Vandals to get what you desire. Actually, it's far better to leave them alive. When you assault and damage a Reader Vandal, it'll drop a yellow engram like those you utilize to very first go into the Loot Cave at the beginning of the Grasp of Avarice. Pick up an engram, and also you gain the Burdened By Treasure rebuff. You'll then have 30 seconds to open the equivalent treasure chest prior to the rebuff's timer goes out. If it strikes no, you'll die, so make certain you understand where you're hosting likely to get to the chest and also can get there quickly before getting any engrams.
If you're doing Grasp of Avarice with three players-- the simplest means-- note that each of your colleagues will require opening up each chest; one player opening a chest doesn't count for the entire team.
Once you have actually gotten all 3 breasts unlocked, you'll get the Gjallarhorn catalyst, which indicates you don't need to total Grasp of Avarice to make it. Presently, the dungeon is pestered to ensure that you can only get its shield and also tool decreases when per personality, so if you do not have alternates to run it on, you might want to bail after grabbing the stimulant however before dealing with down the last employer.
 Below's where you can discover each of the upper bodies in Grasp of Avarice as well as its equivalent Reader Vandal, and also exactly how to unlock them all.
Chest No. 1: The Loot Cave
The initial chest is the most convenient to locate. When you go into the Loot Cavern by dropping via the opening that opens up at the first crystal you encounter, you'll come right into a big cave filled with adversaries. You'll get on the left side of the space with some girders above you; ahead will certainly be some Hive opponents, as well as throughout the water from them (as well as you) will be the Reader Vandal and a set of orange-bar Drug bodyguards.
Initially, look up where you initially get in the space, where the rusted steel beams are. You can go across under this framework to advancement, but simply above you will be an additional platform with the chest on it.
So your goal here is to assault the Reader Vandal, get hold of an engram, then jump back across the void as well as open the chest. It's a pretty straightforward procedure, and as stated, you don't need to entirely kill the Vandal to get it to go down engrams. A useful way to take care of this is to bring your team over to the Vandal when you've removed the other adversaries and also attack it with swords for fast damage. Get your engrams as well as jump back to the chest to get your very first third of the catalyst-- you'll recognize it worked if you get a message in the left corner of your screen that claims You recuperated looted fragments.
Chest No. 2: The Stairways Deathtrap
As you progress with the first part of the dungeon, you'll eventually hit a cylindrical room with 4 closed rolling steel doors. Below, the game teaches you about the Scorch Cannon technician made use of throughout the remainder of the dungeon. After you open and unlock all four doors, you'll be able to leave the area up a flight of staircases. You'll likely bear in mind obtaining squashed by a huge steamroller-type barrel your first time via this area.
Dodge the barrel (or get squashed by it) after that ascend the staircases to the top, where you'll go into a huge area that appears like a flooded, spoiled garage. The Reader Vandal is waiting for you below, and you can not miss him-- actually, you'll probably require running past him to proceed. To leave this area, climb some boxes to get in an open air vent expenses.
Attack the Vandal and grab your engram, after that go into the vent above. Follow it to its end, where you'll go down right into another swamped area, near a collapsed column with a catwalk surrounding it. Resort to your right as well as deal with the back wall surface of this area, where you should see an anxiety that you can jump to. Your second treasure chest is right here, along with your 2nd helping of looted fragments.
Chest No. 3: The Sunken Lair
You will not get to the last chest till right before the dungeon's last employer. After the sparrow section of Grasp of Avarice, you'll get in a(other) huge below ground cave, this one with some waterfalls and several Dropped stations. In the center is a huge round structure, and each station has launchers to send you flying from one to the various other.
You can't discover the chest in this room, or the Reader Vandal to open it, up until you've ruined the Fallen Shield and completed the experience. If you have actually been via here once, you recognize what you need to do to eliminate the Servitors and ruin the guard generators over you.
Keeping that off the beaten track, you're complimentary to hound both the chest and the Reader Vandal to open it. This is the only one of the chests that's really sort of difficult to open up, as well as that 30-second timer is hosting likely to be a problem. You'll wish to see to it, you're fully prepared to get back to the chest before you select up an engram, and it's easiest to do this with another gamer or more who can assist out, with each of you dealing with it one by one.
First, the chest: It gets on the central island, in addition to the building in the middle of it. You can climb up on top to locate the chest following to some open boxes of blank engrams. Focus on where you're headed, because you're going to require to reach this chest as fast as you can.
Next off, the Reader Vandal: He remains in the station in the back corner of the cave, up and to the right of the central island if your back is to where you entered this cave. To arrive, you can make use of the launcher on the central island to shoot yourself. It's the high cliffs with the falls. Try to find the Vandal on the bridge resulting in the building closest to the back wall surface of the cave, surrounded by water.
To obtain back to the chest, straighten the launcher found at this station to shoot you to the central island. If you can utilize something like Titan's Thunder crash or top-tree Dawn blade as a Warlock to get on your own there faster, that's a great idea. But for Seekers particularly, you're going to require launching on your own as well as climb up the building as fast as possible.
The very best method my group found to do this was to leave someone near the launcher with a Scorch Cannon, while the person opening the chest hosted likely to collect their engram. By doing this, the Scorch-wielder can introduce the engram-runner as quickly as they were all set. That aided slash off a second or more-- releasing on your own is sort of a discomfort-- however anticipate to be down to the wire getting back to that main island.
Open up that third chest, and you'll lastly assemble the Gjallarhorn catalyst. You'll currently require racking up a lot of eliminates with the launcher in order to lastly unlock the benefits of the stimulant. Expect to earn 400 rocket launcher kills, however the benefits of doing so, including Orbs of Power generation, the mega rocket produced by scoring eliminates, and also faster reload, should help to make Gjallarhorn one of the most reliable damage-dealing weapons in the video game-- great for boss battles.
There's a lot going on in Destiny 2 now as part of the 30th Anniversary DLC. Check out our overviews on how to get Halo weapons in Destiny 2 and also exactly how to open the Forerunner Unique sidearm (which is a variation of Halo's pistol). Fate 2 also got a massive patch with Update 3.4.0.


Comments
Post a Comment